Categories
Acoustic Ramp Diffuser Products Ramp FAQs

What Is an Acoustic Ramp Diffuser?

The Acoustic Ramp is a wedge-shaped, quadratic residue diffuser (QRD) used to improve the acoustic properties of a room. The depth of the wells between the dividers changes over the length of the diffuser and this greatly improves the effective bandwidth. The ratio relationships between the well depths stay the same. The angled reflectors and wedge shape causes the effect of scattering both vertically and horizontally. We have done a lot of scientific testing and subject critical listening testing.Vertical Acoustic Ramp Drawing

In critical listening rooms, an array of Acoustic Ramps make an ideal rear-wall treatment that helps to tighten the definition of imaging and clarifies the sound stage. In surround home theaters and group audiophile listening spaces, this rear-wall treatment helps to create a sense of envelopment and immersion for the listeners.

The goal of an Acoustic Ramp diffuser is to control the existing acoustics of the room WITHOUT absorbing the acoustic energy. A reflection of sound off of a flat hard surface can be disorienting and distracting. A reflection can mix with the source of the sound and cause comb-filtering which changes the timbre or tone-color of what you are hearing. People often describe the effect of comb-filtering as “hollowing out” the sound, making the sound “tinny”, or sounding like it is in a “garbage can.” Usually these are not the adjectives we want someone to use when describing our music!

The Acoustic Ramp is available custom built to your exact specifications. The standard Ramp is constructed of 1/2″ Rock Maple plywood reflectors, 1/8″ black powder-coated aluminum dividers and a 3/4″ Rock Maple plywood top plate. The Ramp is 24 1/8″ wide, 12 1/8″ deep and a hair under 45″ tall. Custom ramps are available in almost any size configuration, with any choice of materials with any color powder coating. Here’s photos and posts about some custom versions:

See-Through Acrylic at Andy Hong’s Kimchee Records
MDF and Pine Plywood at Echo Boston
Raw Aluminum and Rock Maple at Paul Pesco’s Studio 44
Custom-made Bamboo Stock Ramp


Categories
Acoustic Ramp Diffuser Ramp FAQs

FAQ: Acoustic Ramp Lobing and Artifacts

Q: Are there any phase or lobing issues with the Ramp diffuser? Can I place them side to side abutting each other in exactly the same orientation?
If there are lobing issues, how widely should they be spaced apart to minimize the problem?
A: All arrays of diffusers have some kind of lobing or artifacts, but the ramps are significantly better than box-style QRD diffusers. The resonant cavities on the ramps are less parallel and therefore are less tonally resonant.

I have found that you need your ears to be about 2-3 times the depth of the diffuser to avoid being able to notice the artifacts or lobing when you move your head back and forth when the Ramps are installed vertically.

In a control room, the best way to avoid the lobing issue is to do a set up like I did at Echo Boston (http://www.xix-acoustics.com/2012/07/19/acoustic-ramp-diffuser-install-at-echo-boston/)

The artifacts are only audible when you move your ears up and down when you are very close to the ramps. This configuration is the best sounding of all of the installations for a control room’s rear wall because there is an extremely even diffusion both horizontally and vertically. The improvements in sweet spot imaging are really surprising.

Categories
Acoustic Ramp Diffuser Acoustic Treatment Products Ramp FAQs Ramp Install

Which Mounting System for the Acoustic Ramp?

We have recently received a number of questions from people planning to install an array of Acoustic Ramps in their listening rooms. Most people are interested in the differences between the two installation styles: permanent and temporary.

Use the temporary installation if any of the following are true:

  • You don’t own the space in which you are installing the Ramps
  • You want to be able to use the Ramps in multiple locations like for diffuser gobos (see the Studio 44 photos)
  • You don’t want to drill holes in the Ramps
  • You want the most flexible installation possible
  • You don’t want/need a horizontal installation

Use the permanent installation if:

  • You own the space and you want the most rigid and secure installation possible
  • You live somewhere where earthquakes are common
  • You want to install the Ramps horizontally (see Horizontal installation photos)

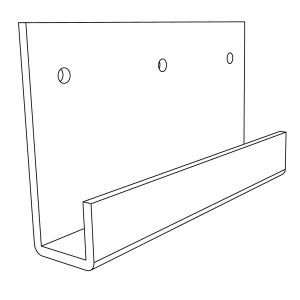
The Ramps come with the hardware for temporary installation: a hanging “J” hook and a cross piece that is installed on the rear of the Ramp. This is the easiest type of installation. Essentially you screw the “J” hook to the wall. Then you attach the cross piece to the back of the Ramp and hang the Ramp on the hook. Very simple.

Wall Mounted "J" Hanger Hook
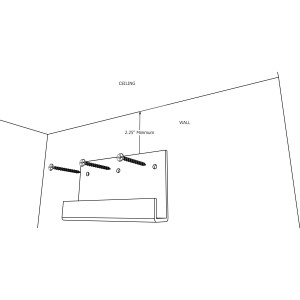
Installation of the Hanger Hook
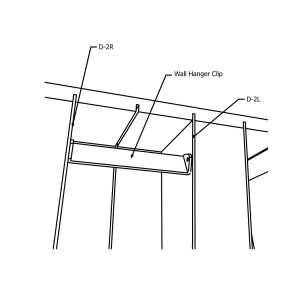
Hanger Cross Bar Clip
Hanger Cross Bar Clip installed on the back of the Ramp

You install the hook on the wall at least 2¼ ” from the ceiling using a level and appropriately strong fasteners (like 3″ drywall screws into studs.) Use a level to make sure the hook is level. Next you install the hanger bracket cross bar to the back of the Ramp. Then simply hang the Ramp on the hook. The Ramp will drop into place and be pressed against the wall.

Here’s a video of a permanent installation.